
Aim ahead of the target by the shell flight time. Read the flight time with Alt (or enable Full Alternative Battle Interface so it's always visible), place your crosshair that far in front of the ship, and fire. Everything else in this guide builds on that foundation.
Do this right now before your next match:
- Enable Full Alternative Battle Interface in Settings so shell flight time shows constantly without holding Alt
- Switch to the dynamic crosshair (the ticks map to a 30-knot perpendicular target)
- Fire one or two turrets as a pilot shot first, watch where shells land, then correct before your full salvo
- Aim AP at the waterline when the target is broadside to hit the citadel
- Aim HE at the superstructure and deck for module damage and fires
- If the target angles hard after your first shot, switch to HE immediately
Memorize those six steps. They work at every tier and in every ship class.
Key Takeaways
Leading the target by shell flight time, using the right ammo for the target's angle, and firing a pilot shot before committing a full salvo are the three habits that produce the fastest improvement in hit rate.
| Point | Details |
|---|---|
| Lead by flight time | Read the Alt readout or dynamic crosshair tick and place your aim point that far ahead of the bow. |
| Pilot shot first | Fire one or two turrets to verify lead before committing the full salvo. |
| AP at waterline, HE at superstructure | AP targets the citadel on broadside ships; HE hits modules and starts fires on angled or lightly armored targets. |
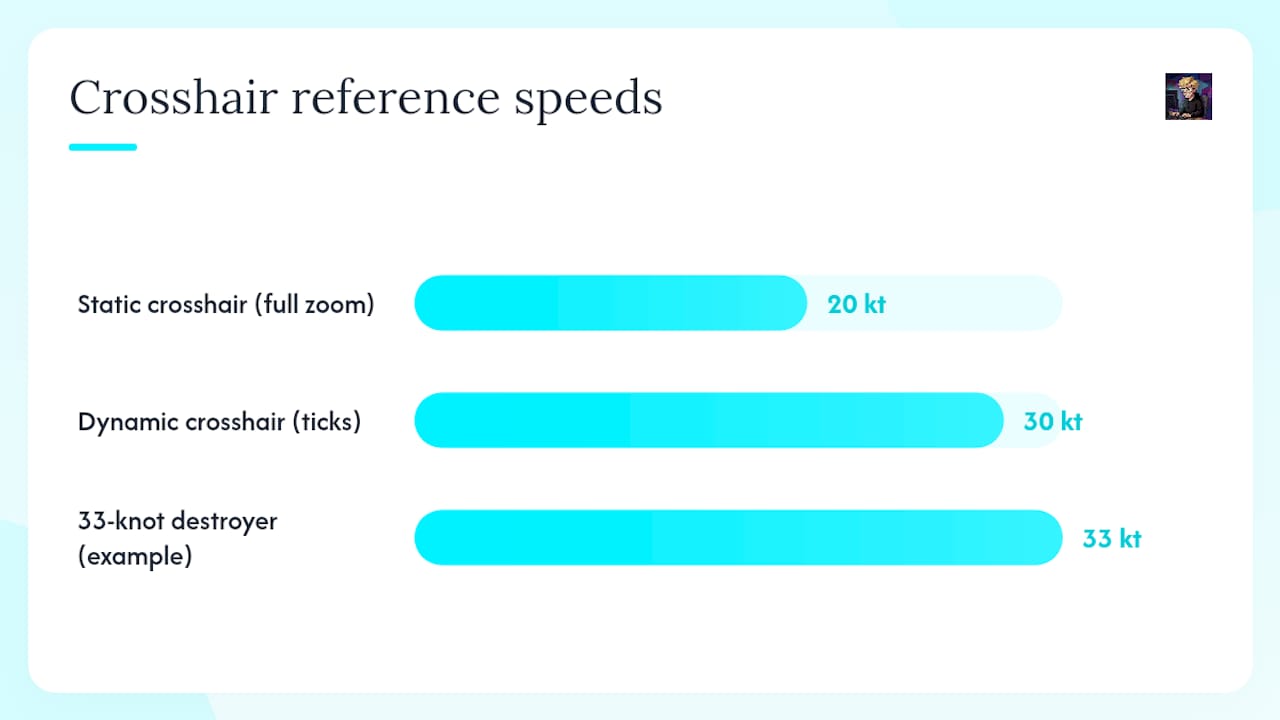
| Dynamic crosshair = 30 kt reference | Switch from the static crosshair (20 kt) to the dynamic one for accurate tick-based lead on fast targets. |
| Jayplaysgames drills | Use the three focused drills from this guide, track your hit rate after each session, and check the WoWS tier list for high-sigma ships to practice with. |
Table of Contents
- How does aiming actually work in World of Warships?
- Which crosshair and HUD settings give you the best aiming info?
- How do you estimate the right amount of lead in a real fight?
- Where should you aim for each ship class?
- Short drills to build lead estimation fast
- Common aiming mistakes and how to fix them
- Advanced aiming: angling, plunging fire, and shooting through smoke
- Quick reference: crosshair ticks, ammo zones, and interface settings
- Why these drills actually work, from the Jayplaysgames team
- More guides and game coverage at Jayplaysgames
- Sources
- FAQ
How does aiming actually work in World of Warships?
The core mechanic is leading the target: your shells take time to travel, so you must fire at where the ship will be, not where it is now. Shell flight time is the key variable, and the game gives you that number directly if you know where to look.
Hold Alt mid-battle and the flight-time readout appears below your crosshair. Multiply that number by your estimate of the target's speed and you get the lead distance. A fast cruiser crossing at 12 km needs roughly 2–3 ship lengths of lead ahead of the bow. At 18 km, that same cruiser needs noticeably more. The math is not precise, but the principle is consistent: longer range and faster targets demand more lead.
Relative motion matters just as much as raw speed. A ship sailing straight toward you needs almost no horizontal lead. A ship crossing at 90 degrees needs maximum lead. A ship angled at 45 degrees falls somewhere in between, and your aim point shifts accordingly. Both ships are moving, so your own course and speed affect the geometry too. When you're turning hard, your aim point drifts, which is one reason experienced players straighten up briefly before firing.
Dispersion and sigma explain why even a technically correct aim can produce misses. Every ship has a dispersion ellipse, an oval-shaped spread pattern where shells land around the aim point. Sigma is the statistical tightening factor: a high-sigma gun clusters shells toward the center of that ellipse, while a low-sigma gun scatters them more randomly. Closing range shrinks the ellipse, which is why shots that feel perfect at 20 km still miss while the same aim at 10 km connects cleanly. Dispersion decreases as range decreases, so whenever the tactical situation allows it, close the gap.
Pro Tip: Fire your turrets sequentially rather than simultaneously when you want to probe a target's position. Simultaneous fire stacks all shells in one overlapping ellipse. Sequential fire spreads them across slightly different aim points, which increases the chance that at least one shell finds the target when you're uncertain of the exact lead.
Which crosshair and HUD settings give you the best aiming info?
The right settings cut the mental work in half. Here's what to configure before your next session.
The World of Warships Wiki's gunnery guide confirms the tick mapping difference that most players miss: the dynamic crosshair numbers correspond to shell travel time for a target moving perpendicular at 30 knots, while the default static crosshair at full zoom maps to 20 knots. If you're using the static crosshair and your target is a 33-knot destroyer, you're reading the wrong reference speed and your lead will be short every time.
Settings checklist:
- Full Alternative Battle Interface: Go to Settings > Controls and set Battle Interface to "Full Alternative." This keeps the flight-time readout visible at all times without holding Alt.
- Dynamic crosshair: Switch to it in the crosshair selector. The numbered ticks become a direct flight-time ruler for fast targets.
- Target lock (X key): Pressing X locks your camera to the target, which helps track a maneuvering ship without losing your aim reference. Release it when you want to free-look.
- Binocular view (Shift): Binocular view gives a more precise sniper aim and is the right mode for most shots beyond 8 km. Third-person view is useful for situational awareness but not for precision fire.
- Shell camera: After firing, follow your shells to see exactly where they land. This is the fastest feedback loop available in the game.
For latency issues, the fix is simpler than most players expect: fire slightly earlier than your calculated aim point. Network lag means the server registers your shot a fraction of a second after you click, so the target has moved a little further. A small extra lead compensates for that delay. If you're seeing consistent short misses on crossing targets, latency is often the culprit before anything else.
Pro Tip: If the HUD feels cluttered in close-range fights, reduce the minimap size and turn off the damage counter overlay temporarily. Fewer visual elements means your eye goes straight to the crosshair and the flight-time number, which is all you need in a knife fight.
How do you estimate the right amount of lead in a real fight?
Use the flight-time readout, judge the target's presentation, and pick a speed bracket. That three-step process works in every engagement without memorizing exact ship speeds.
Step-by-step in combat:
- Read flight time from the Alt readout or the dynamic crosshair tick.
- Judge target presentation: Is the ship crossing (broadside), angled, or bow-on? Broadside = full lead. Bow-on = minimal horizontal lead. Angled = partial lead, roughly half of broadside.
- Pick a speed bracket: Slow (under 20 knots, typical battleships), medium (20–27 knots, most cruisers), fast (28+ knots, destroyers and some light cruisers). You don't need the exact number.
- Place the aim point proportionally ahead of the bow. For a fast crossing target at medium range, 2–3 ship lengths ahead of the bow is a reliable starting point.
Visual cues help when you can't read the speed directly. Smokestack smoke that curves sharply backward signals high speed; a nearly vertical plume means the ship is slow or stopped. Wake length works the same way: a long, churning wake means the ship has been moving fast for a while. Turret rotation direction tells you where the captain intends to go next.
Two contrasting scenarios: Against a cruiser crossing at 90 degrees at 12 km, you need maximum lead, roughly 2–3 ship lengths ahead of the bow, and you fire AP at the waterline. Against an angled battleship at 15 km, the horizontal lead drops to near zero because the ship is presenting its bow, and you switch to HE because AP will likely ricochet off the angled belt. Same flight time, completely different aim point and ammo choice.
Where should you aim for each ship class?
The one-sentence rule: aim AP at the waterline of broadside ships for citadel hits, and aim HE at the superstructure of everything else. Class-specific details sharpen that rule.
-
Battleships (playing as or targeting): When broadside, aim AP at the waterline just below the main belt to reach the citadel. At long range or when the target is angled, switch to HE and aim at the deck or superstructure. HE also works well against destroyers and lightly armored targets where AP over-penetrates without detonating.
-
Cruisers: Use AP on broadside cruisers, aiming at the waterline or just above it where the citadel sits higher than on battleships. HE is the right call against angled cruisers or when you need to strip modules and start fires. High-penetration cruiser guns can citadel other cruisers reliably; lower-penetration guns should default to HE more often.
-
Destroyers: HE is almost always correct against destroyers. AP over-penetrates thin destroyer hulls and exits without detonating. Aim at the superstructure or the center of the hull. Lead more aggressively than you think you need to, because destroyers at 30+ knots move faster than your instinct accounts for. Aim at the bow or stern when the destroyer is maneuvering hard, since those sections are harder to dodge.
-
Carriers/aircraft: Carrier aiming in strike mode is handled at the squadron level, not the ship-gun level. The targeting reticle for torpedo and bomb drops accounts for lead automatically based on the attack run angle. The skill there is approach angle and timing, not manual lead calculation.
Pro Tip: Against a broadside battleship at medium range, aim at the lower edge of the hull paint stripe at the waterline, not the center of the ship. That stripe is often the visual marker closest to the citadel. Many players aim center-mass out of habit and consistently hit the belt armor instead.
Short drills to build lead estimation fast
The core practice rule: do focused 10–15 minute drills on one variable at a time. Trying to fix everything at once produces no measurable improvement. Pick one drill per session.
Drill 1: Pilot-shot calibration. In a training room or co-op battle, fire a single turret at a moving target and watch where the shell lands relative to the ship. Don't fire the full salvo yet. Adjust your aim point based on where that shell hit, then fire the rest. Repeat 10 times per session. After a week, you'll instinctively know how much to correct without thinking.
Drill 2: Smoke and wake reading. Pick a target at 12–15 km and spend 30 seconds reading only visual cues before firing: smoke curvature, wake length, turret direction. Make a speed guess, then fire and see how close your lead was. This trains the visual estimation habit that carries over when the Alt readout is obscured or you're under pressure.
Drill 3: Dynamic vs. static crosshair comparison. Play one co-op match with the dynamic crosshair, then one with the static. Note which targets you hit and miss with each. Most players find the dynamic crosshair more accurate on fast targets and the static more comfortable on slow battleships. Finding your personal preference takes about two sessions.
Cadence: Three 15-minute focused sessions per week produces faster improvement than one long unfocused session. Track your hit rate in the post-battle stats screen.
Common aiming mistakes and how to fix them
The most common root cause of missed shots is misreading flight time, which leads to either too much or too little lead. Almost every other mistake traces back to that.
Checklist of mistakes and fixes:
- Overleading: You're placing the aim point too far ahead. Usually caused by using the dynamic crosshair tick for a slow target. Fix: judge the target's speed bracket first, then scale the tick down proportionally.
- Underleading: Shells land behind the target. Most common on fast destroyers or when you're using the static crosshair for a 30-knot ship. Fix: switch to the dynamic crosshair and add one more ship length of lead than feels natural.
- Wrong crosshair for the situation: Using the static crosshair (20-knot reference) on a fast cruiser. Fix: switch to dynamic for anything above 25 knots.
- AP on an angled hull: AP shells ricochet off angled belt armor and deal no damage. Fix: switch to HE when the target angles after your pilot shot, and aim at the deck or superstructure.
- Full salvo without a pilot shot: You commit all guns before verifying lead, and the whole salvo misses. Fix: fire one or two turrets first, watch the splash, then correct and fire the rest.
- Ignoring dispersion at long range: At 20+ km, even a perfect aim point produces misses because the dispersion ellipse is large. Fix: close range when possible, or accept that long-range fire is probabilistic and fire more frequently rather than waiting for a "perfect" shot.
Diagnostic questions mid-battle: Are my shells landing consistently short or long? (Range issue, not lead.) Are they landing behind the target? (Lead issue.) Are they hitting but not penetrating? (Ammo type or angle issue.) One question, one fix.
Advanced aiming: angling, plunging fire, and shooting through smoke
Attempt advanced techniques only when the basic lead and ammo rules are already working consistently. The condition for citadel shots by plunging fire: attempt them only at extreme ranges when the target ship has a weak deck armor, because shells fall at a steep angle and hit the deck rather than the belt.
Angling and ricochet: When a target angles toward you, AP shells hit the belt at a shallow angle and ricochet. The ricochet threshold in World of Warships is typically around 45 degrees of shell impact angle. If the target is angling, switch to HE or wait for them to turn broadside. Conversely, if you're the one being shot at, angling your own hull toward the enemy reduces their chance of citadeling you.
Plunging fire happens at extreme ranges where shell trajectories arc high and come down steeply. At those ranges, shells can clear the belt and hit the thinner deck armor directly. This is most effective against ships with historically thin deck plating. The tradeoff is that dispersion at extreme range is large, so you'll land fewer shells overall. Use it selectively when the target is stationary or very slow.
Aiming through smoke: You can't see the target, but you can still fire into smoke effectively. Use the last known position and heading, fire a pilot shot into the smoke, and listen for hit sounds. Adjust aim based on where you think the ship has moved since it entered the smoke. Flight-time readouts still function normally, so the lead calculation doesn't change. Aim slightly higher than you normally would, because ships in smoke often slow down, which means less horizontal lead but the same range.
When targets maneuver unpredictably, stagger your turret fire slightly across adjacent aim points. This "walking" pattern increases the chance that at least one shell finds the target when you're uncertain of the exact lead.
Quick reference: crosshair ticks, ammo zones, and interface settings
The most important sourced mechanic to memorize: dynamic crosshair ticks map to a 30-knot perpendicular target; the static fully-zoomed crosshair maps to 20 knots; AP belongs at the waterline for citadels, and HE belongs at the superstructure for module damage and fires.
| Setting or Rule | Detail |
|---|---|
| Dynamic crosshair tick reference | 30-knot perpendicular target |
| Static crosshair (fully zoomed) reference | 20-knot perpendicular target |
| Recommended interface | Full Alternative Battle Interface (flight time always visible) |
| AP aiming zone | Waterline / citadel belt when target is broadside |
| HE aiming zone | Superstructure, deck, and modules for fires and module damage |
Where to aim by ammo type:
- AP: Waterline on broadside battleships and cruisers to reach the citadel. Avoid AP on angled targets or destroyers.
- HE: Superstructure and deck on any target, especially angled ships, destroyers, and carriers. Aim at module clusters (turrets, funnels, bridge) for module destruction.
- Torpedoes: Lead based on target speed and angle; aim for the center of the hull at the expected intercept point.
Pro Tip: In your first few matches after reading this guide, use the data table above as a mental checklist before each salvo: "What crosshair am I using? What's the target's speed? Where am I aiming?" Running that three-second check before firing builds the habit faster than any amount of passive play.
Why these drills actually work, from the Jayplaysgames team
Jayplaysgames covers World of Warships in depth, from the WoWS beginner guide that walks new players through controls and setup, to the best ships tier list that helps you pick high-sigma guns for practice. The aiming drills in this guide are built on the same verified mechanics the community has tested and repeated across thousands of matches.
The reason these drills work is straightforward: they isolate one variable at a time. Pilot-shot calibration removes the guesswork about lead. Smoke-reading practice builds the visual habit that carries over when numbers aren't available. Crosshair comparison forces you to feel the difference between 20-knot and 30-knot tick mapping rather than just reading about it. Passive play accumulates hours without fixing the underlying habit. Focused drills fix the habit in days.
Track your main battery hit rate in the post-battle stats screen after each session. That single number tells you whether the drill worked.
More guides and game coverage at Jayplaysgames
If this guide helped you land more shells, Jayplaysgames has the same depth of coverage across the rest of World of Warships and dozens of other free-to-play titles. The WoWS beginner guide covers controls, ship classes, and early progression for players still building their fundamentals. The tier list breaks down which ships have the best accuracy profiles for players who want to practice aiming on forgiving, high-sigma guns before moving to harder ones.
Beyond World of Warships, the Jayplaysgames games hub covers strategy, RPG, and MMO titles with the same honest, drill-focused approach. No fluff, no filler, just the mechanics that actually move your stats. Head over, pick a game, and start with the guide that matches where you are right now.
Sources
Primary references used in this guide:
- Ship:Gunnery and Aiming - World of Warships Wiki
- Controls and Firing | World of Warships
- How to aim in World of Warships — Levvel
FAQ
How do you aim properly in World of Warships?
Enable Full Alternative Battle Interface to keep the shell flight-time readout visible, switch to the dynamic crosshair (30-knot tick reference), fire a pilot shot to verify lead, then correct and fire the full salvo. Aim AP at the waterline for citadel hits and HE at the superstructure for module damage.
How do you follow your shots in World of Warships?
After firing, use the shell camera to track your shells to the target. The shell camera shows exactly where your salvo lands, letting you see whether you're leading too much or too little before your next reload.
Where should you shoot in World of Warships?
Aim AP at the waterline when the target is broadside to hit the citadel. Aim HE at the superstructure, deck, or module clusters for fires and module damage. Against angled targets or destroyers, HE is almost always the better choice because AP will ricochet or over-penetrate.
How do you get better at aiming in World of Warships?
Do focused 10–15 minute drills on one variable at a time: pilot-shot calibration, smoke and wake reading, or crosshair comparison. Track your main battery hit rate in post-battle stats after each session.
What is the difference between the dynamic and static crosshair?
The dynamic crosshair ticks map to a 30-knot perpendicular target, while the static fully-zoomed crosshair maps to 20 knots. Use the dynamic crosshair for fast targets like destroyers and light cruisers; the static crosshair underestimates lead for anything moving above 25 knots.