
You can reliably maximize Hydra chests by running three purpose-built teams timed around decap windows, Hex application, and Block Buffs priority. The core logic is simple: you get 3 keys per week, each key funds one team, and each team should serve a distinct damage role. Direct damage teams exploit Exposed Neck windows for burst. Enemy Max HP teams scale regardless of difficulty. Debuff and HP Burn teams with Hex support stack passive damage across all heads simultaneously.
Quick checklist before your first run:
- Confirm you are level 45 and in an active clan.
- Plan three separate teams, one per key, each with a defined role.
- Prioritize Block Buffs and Hex on at least two of your three teams.
- Time your big direct hits to Exposed Neck windows after decap.
- Unlock Quick Battle on each difficulty by hitting the highest chest damage threshold with a single key.
Sample starting teams by difficulty:
- Normal: Lyssandra (lead) + Seeker + Apothecary + Frozen Banshee + Miscreated Monster + Fayne
- Hard: Arbiter (lead) + Lydia + Frozen Banshee + Fayne + Doompriest + Skullcrown
- Brutal/Nightmare: Siphi (lead) + Lydia + Rotos + Fayne + Doompriest + Krisk
These lineups are starting points. Swap any slot using the Raid tier list when a champion is unavailable.
Key Takeaways
| Point | Details |
|---|---|
| Three keys, three roles | Use each weekly key for a distinct team role: direct damage, Enemy Max HP, and debuff/sustain. |
| Decap windows are your biggest damage spikes | Hit Exposed Necks with your highest-damage skills immediately after decap for 200% direct damage. |
| Hex and Block Buffs first | Apply Hex to all heads and maintain Block Buffs uptime before optimizing any other debuff slot. |
| Quick Battle requires a deliberate run | Unlock Quick Battle per difficulty by hitting the highest chest threshold with a single planned key. |
| Jayplaysgames tested setups | The Raid hub on Jayplaysgames provides tested team compositions, tier lists, and rotation updates for every difficulty. |
Table of Contents
- What is the Hydra and how do you access it?
- How do Hydra head rotations and affinities work?
- What core Hydra mechanics do you need to exploit?
- What does each Hydra head do and how do you counter it?
- How do Hydra chest rewards and Quick Battle work?
- How do you build the best Hydra teams for your roster?
- Which artifact sets work best for Hydra champions?
- How do you execute a Hydra run turn by turn?
- What mistakes are killing your Hydra runs?
- Jayplaysgames' tested Hydra setups and what we observed
- What should most players focus on building first?
- Jayplaysgames has more Raid guides ready for you
- Sources
- FAQ
What is the Hydra and how do you access it?
The Hydra Clan Boss is a multi-headed boss fight exclusive to clan members who have reached level 45. Unlike the standard Clan Boss, the Hydra presents up to four active heads at once, each with its own skill set and HP pool. You fight it with up to six champions per key, and you get several keys per week.
Access requirements and weekly structure:
- Reach account level 45 and join an active clan.
- Each player receives multiple Hydra Keys per week, resetting between 08:00 and 13:00 UTC on Wednesdays.
- A champion used in one Hydra run cannot be reused in another run that same week, so roster depth matters.
- The clan must collectively deal enough damage to defeat the Hydra for bonus chest rewards; individual chests are awarded based on your personal damage output.
How chest rewards work:
Hydra chests are tiered by damage. The more damage you deal in a single key run, the higher the chest tier you unlock. Higher difficulty levels (Hard, Brutal, Nightmare) offer better chest contents, including stronger artifact sets and more resources. Defeating the Hydra as a clan adds a bonus chest on top of your personal damage chest.

The practical implication: you want to push as much damage as possible on each key, especially on the highest difficulty your roster can handle. Spreading your best champions across three mediocre teams is worse than concentrating power into one strong team and two support teams. Think of your three keys as a portfolio: one high-damage run, one solid mid-tier run, and one sustain-focused run that still clears a respectable chest tier.
A typical weekly cycle looks like this: Wednesday reset opens your three fresh keys. You run your strongest team first while the Hydra is at full HP. Your second and third runs happen later in the week, ideally before the next Wednesday reset. The Hydra Clash event, which runs monthly, adds a competitive layer where clan damage totals are ranked, making consistent high-damage runs even more valuable.
How do Hydra head rotations and affinities work?
The Hydra does not always bring the same six heads. Each month, Plarium sets a rotation of starter heads and substitute heads, each with a fixed affinity for that cycle. Understanding this system helps you build flexible teams rather than hard-countering a specific head that might not appear next month.
How the rotation system works:
- Each month, the Hydra has a defined pool of starter heads (the heads present at the start of the fight) and substitute heads (heads that spawn when a starter head is decapitated).
- Affinities for each head are fixed within a given monthly rotation, so you can plan around them once the rotation is announced.
- The weekly cycle within a month does not change the head pool, only the Hydra Clash standings reset weekly.
Practical implications for team building:
- Build teams that cover multiple affinities rather than stacking one affinity's champions. A team that only works against Magic heads will underperform in months when Force or Spirit heads dominate.
- Check the current month's rotation before spending resources on a new champion specifically for Hydra. Community resources and the Jayplaysgames Raid hub post rotation updates regularly.
- Substitute heads often have different skill sets than starter heads, so your counter strategy needs to account for what spawns mid-fight, not just what you see at the start.
The affinity system also affects damage. Attacking a head with a strong affinity champion deals more damage, while a weak affinity match reduces output. When you have flexibility in your roster, align your highest-damage champion's affinity with the head you plan to decap first.
What core Hydra mechanics do you need to exploit?
Decapitation is the single most important mechanic in the Raid Shadow Legends Hydra strategy. When a head's HP drops to zero, it is decapitated and leaves behind an Exposed Neck. That Exposed Neck takes greatly increased direct damage, meaning every hit you land on it during the window deals double what it normally would. This is where your biggest damage spikes come from.
How decap and respawn work, step by step:
- Reduce a head's HP to zero to trigger decapitation.
- The Exposed Neck appears in that head's slot immediately.
- Land your highest-damage direct hits on the Exposed Neck during this window.
- After 2 turns (or when the Exposed Neck is destroyed), a substitute head spawns in its place.
- The substitute head arrives with Serpent's Will active, which reduces incoming damage. Do not waste big cooldowns on a freshly spawned head.
HP math example for a single head:
Suppose a head has 10,000,000 HP and your team deals 2,000,000 damage to kill it. The Exposed Neck has its own HP pool. That gap compounds across multiple decap windows in a long run.
Substitute head behavior:
Substitute heads spawn based on which starter head was decapitated. They bring different skills than the head they replace, which can shift your targeting priority mid-fight. If a substitute head carries a mechanic that threatens your team (such as mass debuffs or healing), you may need to pivot your focus immediately rather than continuing to chase another decap.
Pro Tip: Save your highest-damage champion's A3 or big cooldown skill for the moment a head is decapitated. Hitting the Exposed Neck with a fully charged nuke is the single highest-value action you can take in any Hydra run.
What does each Hydra head do and how do you counter it?
The Hydra can field six distinct heads across its rotations. Each head has a signature mechanic that can derail a run if you ignore it. Here is what each one does and how to handle it.
Community-made graphical Hydra guides condense these mechanics into quick-reference visuals, and Discord diagrams map head skills to counters in a single image. Both are worth bookmarking alongside this text breakdown.
Torment Head
Torment applies a stacking debuff that increases damage taken by your champions. Left unchecked, it will shred your team's survivability within a few turns. Counter it with a champion who can Block Debuffs on your team or cleanse the stacks before they reach dangerous levels. A Veil champion also works well here, since veiled champions cannot be targeted by single-target debuffs.
Decay Head
Decay places HP Burn on your champions. HP Burn ticks every turn and ignores most defensive stats, making it one of the most dangerous sustained damage sources in the fight. Counter it with a cleanser who can remove HP Burn reliably. Doompriest is a widely available option. Block Debuffs also prevents Decay from landing HP Burn in the first place, making it doubly useful here.
Suffering Head
Suffering strips buffs from your champions, removing shields, continuous heals, and any defensive buffs you have stacked. This head punishes teams that rely heavily on buff uptime. Counter it by running champions whose skills do not depend on buff duration, or by applying Block Buffs to your team before Suffering takes its turn. Alternatively, a champion who can reapply buffs quickly reduces the damage from each strip.
Mischief Head
Mischief steals your buffs and uses them against you, turning your own shields and attack buffs into threats. This is the head that makes Block Buffs a near-mandatory inclusion on every Hydra team. If Mischief cannot steal buffs because your team has none, it loses most of its threat. Counter it by running Block Buffs consistently and avoiding buff-heavy compositions that give Mischief more to steal.
Blight Head
Blight applies Hex to your champions. This is actually a mechanic you want to mirror on the Hydra itself, because Hex on the Hydra heads causes single-target damage to splash to other hexed heads. When Blight hexes your champions, it is a threat to your team's HP. Counter it with a cleanser or by running champions with high enough Resistance to avoid the debuff landing.
Wrath Head
Wrath deals Fear and True Fear to your champions, causing them to skip turns or use random skills. True Fear bypasses Resistance, so it cannot be resisted. Counter it with Block Debuffs to prevent Fear from landing, or with a champion who can cleanse Fear quickly. Running a Provoke champion on Wrath can also redirect its attacks and reduce the frequency of Fear applications.
Head counter summary:
- Torment: Block Debuffs or Cleanse + Veil
- Decay: Cleanser (HP Burn removal) + Block Debuffs
- Suffering: Block Buffs + fast buff reapplication
- Mischief: Block Buffs (mandatory) + low-buff team composition
- Blight: Cleanser + high Resistance secondary stats
- Wrath: Block Debuffs + Cleanse Fear + Provoke
Pro Tip: When the rotation includes both Mischief and Suffering, prioritize decapping Mischief first. Suffering strips buffs, but Mischief weaponizes them. Removing Mischief early lets your buff-dependent champions operate freely for the rest of the run.
How do Hydra chest rewards and Quick Battle work?
Hydra chests are the primary reason to push damage every week. The reward structure rewards both damage volume and difficulty level, so understanding the tiers helps you decide where to spend your keys.
How chest tiers work:
- Each difficulty (Normal, Hard, Brutal, Nightmare) has its own set of damage thresholds that correspond to chest tiers.
- Your personal damage in a single key run determines which chest tier you receive for that run.
- Defeating the Hydra as a clan adds a bonus chest, separate from your personal damage chest.
- Higher difficulty chests contain better artifacts, including variable sets like Stone Skin and Protection that are highly valuable for Hydra teams themselves.
Quick Battle unlock rules:
According to the official Plarium guide, Quick Battle unlocks per difficulty when you deal enough damage with a single key to reach the highest chest threshold on that difficulty. You must unlock it separately for Normal, Hard, Brutal, and Nightmare.
When to use Quick Battle and when to run manually:
- Use Quick Battle once unlocked on difficulties where your team consistently hits the top chest tier. It saves time without sacrificing rewards.
- Run manually when you are learning a new team composition, testing a new champion, or trying to push into a higher chest tier for the first time.
- Run manually on a new difficulty until you have confirmed your team can hit the Quick Battle threshold. Unlocking Quick Battle on Nightmare requires a deliberate, optimized single-key run, not just a casual attempt.
The practical strategy: unlock Quick Battle on Normal and Hard first, then use those two keys on Quick Battle while spending your third key on a manual Brutal or Nightmare attempt. This approach maximizes weekly chest value while still giving you a learning run on harder content.
How do you build the best Hydra teams for your roster?
The best Hydra team for your account is the one that covers all five essential roles without leaving a critical gap. Raw damage output matters less than role coverage, especially on higher difficulties where a missing cleanser or Block Buffs champion can end a run in the first ten turns.
The five essential roles:
- Block Buffs applier: Neutralizes Mischief and Suffering heads. Must have high Accuracy to land reliably.
- Hex applier: Places Hex on all active heads. Hex distributes a portion of single-target damage to other hexed heads (2% for AOE hits), making it the highest-leverage debuff in the fight.
- Decrease DEF / Weaken: Amplifies all damage your team deals. Stack both when possible.
- Enemy Max HP nuker: Deals damage based on the Hydra's maximum HP, scaling naturally with difficulty. Particularly strong on Nightmare where raw HP pools are enormous.
- Sustain (healer, reviver, cleanser): Keeps your team alive long enough to complete the run. At least one dedicated cleanser for HP Burn and Fear is non-negotiable.
Stat targets by role:
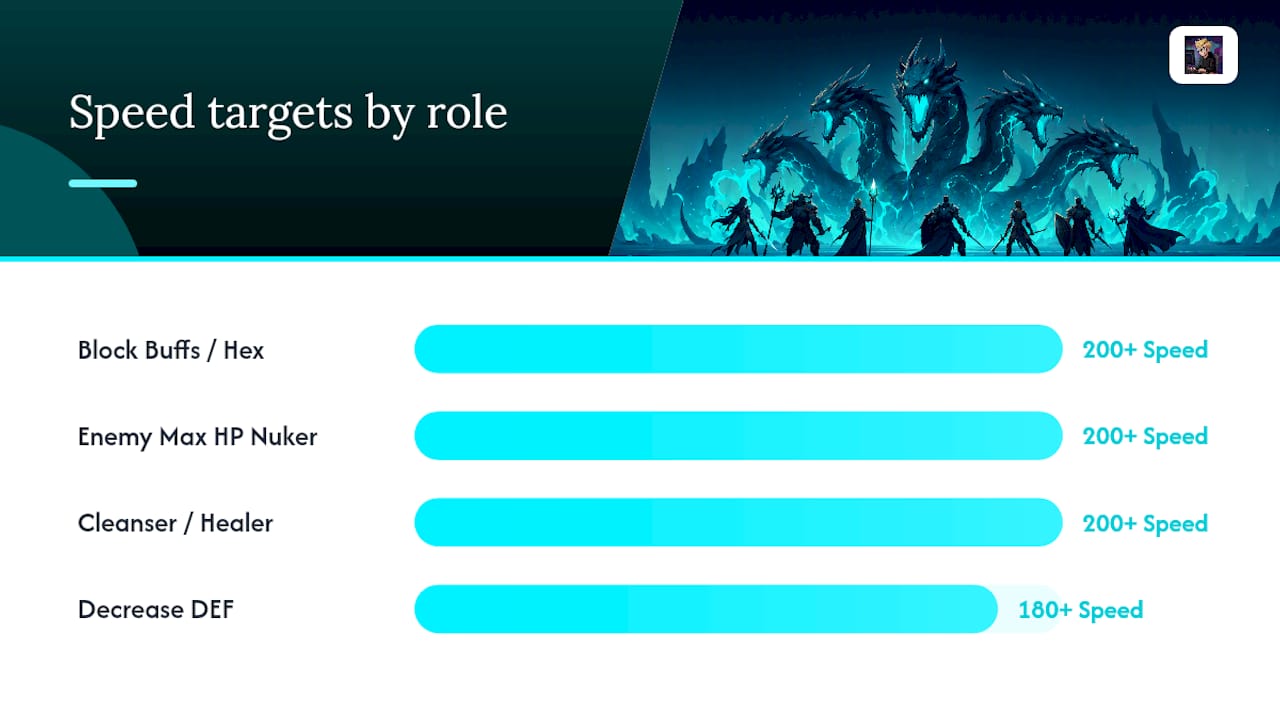
- Block Buffs / Hex applier: 250+ Accuracy, 200+ Speed, 50,000+ HP
- Enemy Max HP nuker: maximize HP% and DEF%, 200+ Speed, Accuracy optional
- Cleanser / healer: 200+ Speed, 60,000+ HP, 3,000+ DEF
- Decrease DEF applier: 250+ Accuracy, 180+ Speed
Speed tuning principle: Your Block Buffs champion should move before the Hydra heads take their first turn. Your Hex applier should move second or third. Your nuker moves after debuffs are in place.
Sample teams by difficulty:
Normal (F2P friendly): Lyssandra (lead) + Seeker + Apothecary + Frozen Banshee + Miscreated Monster + Fayne. Swap Fayne for Kael if unavailable. Swap Miscreated Monster for Armiger if you need more Block Buffs uptime.
Hard (mid-roster): Arbiter (lead) + Lydia + Frozen Banshee + Fayne + Doompriest + Skullcrown. Swap Skullcrown for Rotos if you have him. Swap Lydia for Scyl of the Drakes if Lydia is unavailable.
Brutal / Nightmare (advanced): Siphi (lead) + Lydia + Rotos + Fayne + Doompriest + Krisk. Swap Krisk for Geomancer if you need more Enemy Max HP damage. Swap Siphi for Arbiter if you lack Siphi.
For alternative champion picks across all slots, the Raid best champions page lists role-specific options organized by rarity and availability.
Which artifact sets work best for Hydra champions?
Artifact sets for Hydra follow role logic more than any universal rule. The right set for a cleanser is different from the right set for an Enemy Max HP nuker, and mixing them up is one of the most common reasons teams underperform.
Set priorities by role:
- Sustain roles (healer, cleanser, reviver): Protection set or HP set. Protection provides a shield that absorbs damage before HP, extending survivability significantly. Stone Skin is the premium option if you have it, offering both HP and a conditional shield.
- Enemy Max HP nuker: HP set stacked with DEF set. The more HP and DEF your nuker has, the higher the damage on Enemy Max HP skills. Stone Skin is again the best-in-slot for this role.
- Block Buffs / Hex applier: Accuracy set to hit the 250+ Accuracy threshold, combined with Speed set if you need to hit turn-order targets. Once Accuracy is covered by substats, swap Accuracy set for HP or DEF.
- Decrease DEF / Weaken applier: Accuracy set + Speed set. These champions need to land debuffs reliably and move early in the turn order.
Main stat priorities:
- Chest: HP%
- Gloves: HP% or DEF%
- Boots: Speed (for debuffers and support) or HP% (for nukers who are already fast enough)
- Ring, Amulet, Banner: HP, DEF, or Accuracy depending on role
Substat priorities: Speed, HP%, DEF%, Accuracy (in that order for most roles). Resist is worth stacking on champions who face Fear from the Wrath head.
Stone Skin and Protection sets drop from Hydra chests themselves, which creates a natural progression loop: the better your Hydra runs, the better the sets you earn, which improve future runs. For a deeper breakdown of artifact builds and set mixing, the Raid gear guide covers stat thresholds and set combinations in detail.
How do you execute a Hydra run turn by turn?
Knowing your team composition is half the battle. Executing it correctly in the fight is the other half. Turn order and timing decisions in the first 12 turns often determine whether a run hits the top chest tier or falls short.
Turn order template for the first 6 turns:
- Block Buffs champion moves first, applies Block Buffs to all active heads.
- Hex applier moves second, places Hex on all heads.
- Decrease DEF champion applies DEF down and Weaken.
- Enemy Max HP nuker fires its main skill with all debuffs active.
- Cleanser moves to remove any debuffs that landed on your team in the Hydra's first turn.
- Speed support champion (if present) grants extra turns or extends buffs.
Target priority rules:
- Focus one head at a time to trigger decap windows. Spreading damage across all heads delays every decap and reduces your total Exposed Neck uptime.
- Prioritize decapping the head with the most dangerous mechanic first (typically Mischief or Wrath, depending on the rotation).
- After decap, shift all direct damage to the Exposed Neck immediately. Do not waste turns hitting other heads during this window.
- When a substitute head spawns with Serpent's Will active, switch focus to a different head until Serpent's Will expires.
Buff and debuff timing:
- Reapply Block Buffs before it expires, not after. A single turn without Block Buffs gives Mischief a window to steal.
- Apply Hex at the start of the fight and reapply whenever it falls off. Community diagrams show how turn-order charts help visualize when Hex reapplication is needed.
- Provoke the Wrath head whenever possible to reduce Fear applications on your team.
Pro Tip: If a champion dies mid-run and you have a reviver, prioritize reviving your Block Buffs champion over any other role. A dead Block Buffs champion gives Mischief free turns to steal buffs and can unravel a run faster than any other single loss.
For speed tuning concepts that apply directly to Hydra turn order, the Raid Arena guide covers speed thresholds and turn-order math in detail.
What mistakes are killing your Hydra runs?
Most failed Hydra runs come down to the same handful of errors. Fixing one or two of these between runs often produces a noticeable chest tier improvement without changing your entire roster.
Common mistakes and quick fixes:
- No Block Buffs on the team. Mischief will steal every buff you apply and use it against you. Add at least one Block Buffs champion to every team, ideally two for redundancy.
- Wrong speed order. If your nuker moves before your Decrease DEF champion, you are dealing full-defense damage on your biggest hit. Rearrange boots and speed substats so debuffers always move first.
- Overreliance on poison. Poison is strong in the standard Clan Boss but less dominant in Hydra because the fight is shorter and the Hydra has mechanics that punish passive damage strategies. Hex outperforms poison in most Hydra contexts.
- Missing a cleanser. HP Burn from the Decay head and Fear from the Wrath head both require active removal. Running without a cleanser means your team takes unavoidable chip damage every turn.
- Hitting a freshly spawned substitute head. Serpent's Will reduces damage significantly. Wasting your nuker's cooldown on a head with Serpent's Will active is a major damage loss.
- Not planning for Quick Battle unlock. Unlocking Quick Battle requires a deliberate single-key run at the highest chest threshold. If you spend all three keys casually, you may never hit the threshold needed to unlock it.
Pre-run sanity checklist:
- Block Buffs champion is in the lineup and has 250+ Accuracy.
- Hex applier is present and moves in the first three turns.
- At least one cleanser with HP Burn removal is in the team.
- Speed order is confirmed: debuffers before nukers.
- Artifact sets match each champion's role (no Accuracy set on a nuker who needs HP%).
For broader progression context and how Hydra fits into your overall account development, the Raid beginner guide covers the fundamentals that support Hydra readiness.
Jayplaysgames' tested Hydra setups and what we observed
We ran multiple Hydra keys across Normal, Hard, and Brutal difficulties using the team compositions listed in this guide, tracking damage output per run and noting which mechanics caused the most trouble. These are our observed results, not guaranteed benchmarks. Gear quality, champion masteries, and the monthly head rotation all affect your numbers.
Test methodology:
- Difficulty tested: Normal, Hard, and Brutal
- Keys used per difficulty: 3 per weekly reset over multiple weeks
- Damage recorded: end-of-run damage total shown on the results screen
- Champions used: compositions matching the sample teams in the team-building section above
- Streamer runs on Twitch (DeadwoodJedi) were also referenced for Nightmare-level timing and champion interaction examples
Observed results (Jayplaysgames' runs):
These figures reflect our test runs with mid-to-high-end gear. Your results will vary based on artifact quality and mastery completion.
- Normal, Hex + Block Buffs team: consistent top-tier chest unlocks, runs completed within 50 turns
- Hard, Enemy Max HP + Hex team: top-tier chest on most runs, occasional second-tier chest when Wrath head caused Fear disruption
- Brutal, full debuff stack team: second-to-top chest tier on average; top tier achieved when decap windows aligned with nuker cooldowns
Key observations from testing:
- Hex made the single biggest damage difference across all difficulties. Runs without Hex consistently scored one chest tier lower.
- Block Buffs uptime was the most common failure point. Even one missed application gave Mischief enough turns to strip buffs and reduce survivability.
- Enemy Max HP champions scaled noticeably better on Brutal than on Normal, confirming they are worth investing in for mid-to-high difficulty play.
- Serpent's Will on substitute heads caused the most wasted cooldowns. Training yourself to switch targets immediately after a decap is a learnable habit that pays off quickly.
Results vary by gear and rotation. Treat these as benchmarks, not guarantees.
What should most players focus on building first?
Most players approach Hydra by trying to build one perfect team. That is the wrong priority order. The Hydra's three-key structure means you need roster depth across three functional teams, not one exceptional team and two throwaway runs.
Here is the priority order that makes the most sense for the majority of players:
First: Secure a reliable Block Buffs champion with 250+ Accuracy and get them to Hydra-ready gear. Without Block Buffs, Mischief makes every run worse regardless of how strong your damage dealers are. Lydia the Deathsiren is the gold standard here, but Skullcrown, Duchess Lilitu, and several other champions fill this role adequately.
Second: Build an Enemy Max HP nuker. This champion type scales with difficulty in a way that direct damage dealers do not. Investing in one early means your damage output grows naturally as you push into harder difficulties without needing to replace the champion. Rotos the Lost Groom and Geomancer are strong options; Frozen Banshee covers this role at lower rarities.
Third: Tune speed and support across all three teams. Once your damage roles are covered, the limiting factor is usually sustain and turn order. A cleanser who moves too slowly lets HP Burn tick for extra turns. A Hex applier who moves after the nuker wastes the Hex multiplier on the first hit.
This order reflects the Hydra's actual threat hierarchy: Mischief and buff-stripping kill runs faster than low damage does. Fix survivability first, then optimize damage.
Jayplaysgames has more Raid guides ready for you
Jayplaysgames covers Raid: Shadow Legends from beginner fundamentals to Nightmare-level Hydra setups, with tested team compositions, up-to-date tier lists, and rotation tracking updated regularly. If this guide helped you understand the Hydra, the Raid clan boss guide is the natural next step for maximizing your weekly boss damage across both boss types.

The Raid Shadow Legends hub on Jayplaysgames collects every Raid guide, tier list, and champion breakdown in one place. Head there to find the full tier list, artifact farming routes, and champion-specific pages that help you fill the roster gaps this guide identified. Pick one team slot you are unsure about, check the tier list, and run your next Hydra key with a more informed lineup.
Sources
These are the primary references used to build this guide. Check them for visual diagrams, official rule clarifications, and live run examples.
- Guide: The Hydra – RAID: Shadow Legends
- I Made an Easy-to-Follow Graphical Hydra Guide for ...
- Twitch
FAQ
How many Hydra keys do you get per week?
Each player receives 3 Hydra Keys per week, resetting between 08:00 and 13:00 UTC on Wednesdays, per the official Plarium guide.
What level do you need to fight the Hydra in Raid?
You must be at least level 45 and a member of an active clan to access the Hydra Clan Boss.
How do you unlock Quick Battle for the Hydra?
Quick Battle unlocks per difficulty when you deal enough damage with a single key to reach the highest chest damage threshold on that difficulty. You must unlock it separately for each difficulty level.
What is the most important debuff for Hydra?
Can you reuse champions across multiple Hydra keys in the same week?
No. A champion used in one Hydra run cannot be used in another run during the same weekly cycle, which is why roster depth across three distinct teams is necessary for maximizing weekly chest rewards.